How To Clear Queue On Spotify?

Spotify’s queue is an amazing feature that allows us to listen to our favorite songs one after another. With its help, we don’t need to keep changing songs to get the one that we like; instead, we can just make a queue at once, and then only those songs will be playing in our playlist that is our favorites. Not any other random songs.
However, as humans, we tend to get bored with the songs that we listen to every day. In such a situation, people may want to learn how to clear a queue on Spotify. For that reason, I’m writing this ultimate guide for you, which will teach you step-by-step how to clear the queue on Spotify.
Open Spotify> Your Library> Access Playlists> Open Playlist> Three dots> Edit Mode> Select Songs> Delete
You can easily Clear your Queue or delete songs or delete whole playlist on Spotify.
I made a complete and detailed guide on clearing queue on all kind of mobile and computers.
What Is The Queue On The Spotify App?
Spotify queue is the best feature of Spotify, which helps you organize your favourite songs into a playlist and then listen to them one after another. You add all the songs that are your favorites to your Spotify queue. When the songs are added to the queue, and you play them, only the added songs are played one after another.
It means that you won’t have to keep changing the songs repeatedly to find the one you want to listen to. I like listening to Spotify through my AirPods while working out. When I have to keep going to my phone to change the songs to find my favourite one, it distracts me from my workout and takes too much time.
But with the help of the Spotify queue, I’ve added all of my favorite songs to the queue. Now, I just play the songs one time and then start my workout; all of my favorite songs keep getting played one by one. This way, I can only listen to the songs that I’m interested in instead of listening to the ones I dislike.
How To Get To The Queue On Spotify?
Accessing the queue on Spotify is pretty simple. Listen to your favorite tunes, and imagine you want to know what’s next. You can find out by looking at the bottom of your Spotify window. Look for a button that looks like three horizontal lines stacked on each other.
That’s your queue button! Click on it, and boom, a little window will pop up showing you all the songs lined up to play. You can even see the song that’s currently jamming. So, whether you’re itching to switch things up or just curious about the musical journey ahead, that queue button is your go-to guide.
Why Would Anyone Want To Clear The Spotify Queue?
A question arises in everyone’s mind: why would anyone want to clear the Spotify queue? What are the reasons for it? Well, there are many reasons.
We’re humans, mate, and our mood keeps on swinging. Isn’t it? I myself can’t listen to similar songs even for 10 days every day. I have to change them, or else I’ll just get bored. So, the first thing that I do when I’m bored of the songs is clear my Spotify queue and then start a new one with fresh songs.
If your queue has been around for months or years, then a lot of additions might have been made to the music that you might be missing out. Clearing the queue and then creating a new one with updated songs may help you discover new songs and music tastes.
It happened to me once. I was adding songs to my Spotify queue. I was a little in a hurry at that time and, hence, ended up adding a couple of wrong songs to the queue. These songs would ruin my listening experience, especially while I’m working out. I had to go to my phone, which I usually put on charge during exercise, to change the songs. Therefore, I had to clear the queue and start a new one.
If you’re having your friends over to have a party together, they might not like the playlist in your Spotify queue. Maybe they’ll like other songs or music tastes. By clearing the queue on Spotify, you can add all of the songs that your friend likes so they can dance and get the most out of the party.
How To Clear Queue On Spotify?
You can clear the queue on Spotify pretty easily. You can do that by following these steps. However, the queue clearing method is different on Android, Windows, iPad, iPhone, and Mac. Consequently, I’ll tell you the methods separately for each of the operating systems you may be using.
Clearing Spotify Queue on iPad/iPhone:
For all those people using iPads or iPhones to list songs on Spotify, I’ve written the below-mentioned step-by-step guide that teaches you how to clear the queue.
Step 1: Login to Your Spotify Account:
Begin by ensuring you are logged into your Spotify account on your preferred device.

Step 2: Access Your Playlists:
Navigate to your music library, you can see “your Library” at the bottom on page.

Step3: Identify and Open the Playlist:
Locate the specific playlist you wish to remove and click on its title to open it.

Step 4: Enter Edit Mode:
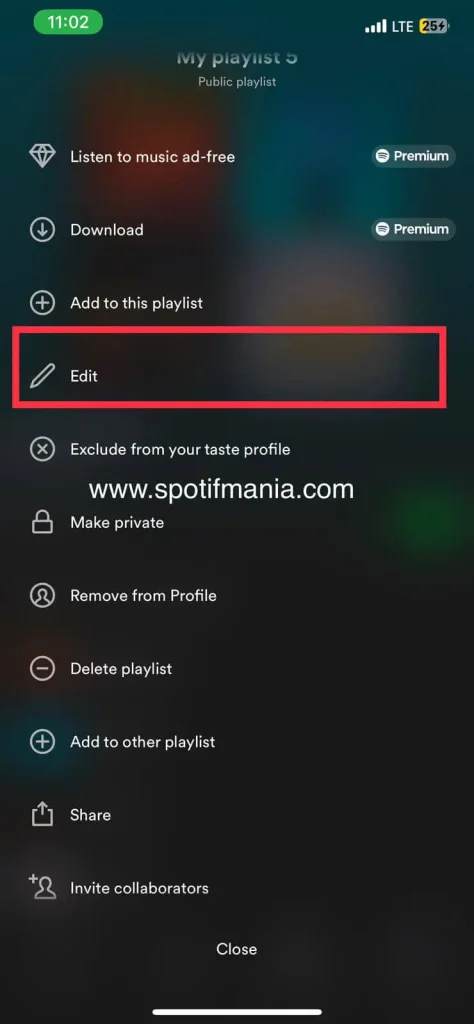
Initiate the deletion process by looking for an three dots which right after the name of the playlist as you I have highlighted the dots with circle in screenshot. Once you clicked on the three dots a new tab is open you can find edit option at the bottom.

Step 5: Select and Remove Songs:
Now, choose the songs you want to delete from the playlist. Typically, this is done by clicking on checkboxes or circles next to each song’s name.
Step 6: Delete the Selected Songs:
Search for the “Remove” or “Delete” option, which is commonly located at the bottom-left corner of the screen. Click on it to remove the selected songs from the playlist.
Step 7: Confirm Deletion (if prompted):
In some instances, Spotify may ask for confirmation before deleting the songs. Confirm the action if prompted.

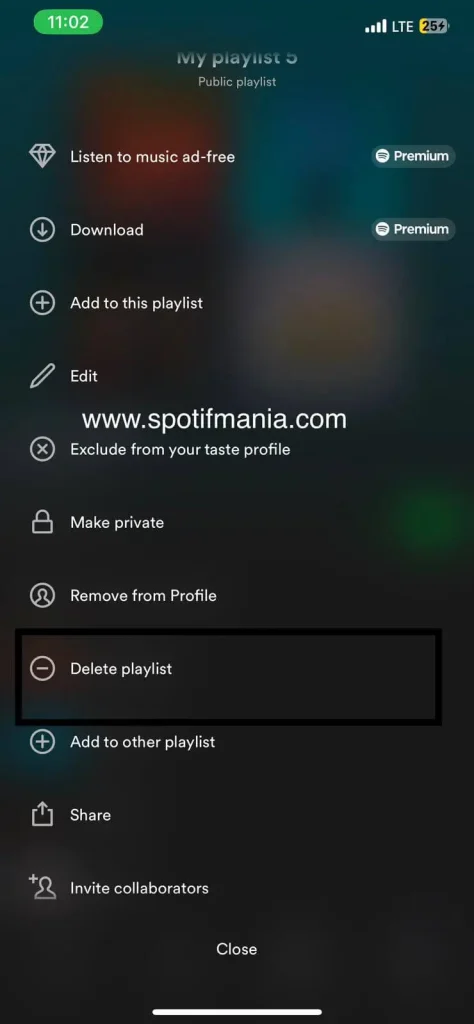
If you ever find yourself with some less-than-pleasant tracks in your Spotify queue, there’s a simple and effective way to bid them farewell. You can easily clear your queue and even delete the entire playlist containing those pesky songs. Here’s how you can ensure your listening experience remains enjoyable and hassle-free on Spotify.
Clearing Spotify Queue on Android:
So, how to clear queue on Spotify on Android mobile? If you’re an Android user using Spotify on your phone, the following steps will help you clear the queue.
To manage your music playback in the Spotify application and clear your queue, follow these step-by-step instructions:
- Open Spotify: Launch the Spotify app on your device.
- Play a Song: Start playing a song of your choice.
- Navigate to Playback Screen: Go to the screen displaying the currently playing song. You can usually find this by tapping on the album cover or song title at the bottom of the app.
- Access Playlist Screen: From the playback screen, look for the option to access your playlist. This is typically represented by an icon like three horizontal lines with an oval on top. Tap on this icon, and it will take you to your playlist.
- Queue Selection: Within the playlist screen, locate the “Queue” icon. This icon is often in the lower-right corner of the screen and is represented by three horizontal lines with an oval shape on top of them. Tap on this icon to access your queue.
- Manage Queue: In the “Queue” section, you’ll see a list of songs that are lined up to play. To remove songs from the queue, tap on the “Next” option associated with the song you want to remove.
- Remove Songs: After selecting the songs you wish to remove from the queue, look for the “Remove” option. This is usually located at the bottom left corner of the screen. Tap on “Remove” to delete the selected songs from the queue.
- Queue Cleared: Congratulations! The songs you marked for removal have now been taken out of your queue. Your queue is now clear and ready for you to add new songs or enjoy uninterrupted playback.
By following these steps, you can effectively manage your music queue on Spotify and enjoy a tailored listening experience.
Clearing Spotify Queue on Windows:
I know that not many of you may be using the Spotify app on your Android but also on Windows. So, this is how to clear queue on spotify on windows.
- Open Spotify on Windows: Launch the Spotify application on your Windows computer.
- Play a Song from the Queue: Start playing any song that is currently in your queue by clicking on it.
- Access the Queue: To manage your queue, locate the “Queue” button at the bottom of the Spotify interface. This button is typically represented by three horizontal lines (≡). Click on it.
- View Queued Songs: A panel will pop up, displaying the songs that are currently in your queue.
- Clear the Queue: Within the queue panel, look for either a trash can icon or an option that says “Clear.” Click on this icon or option to initiate the process of removing all songs from the queue.
- Confirmation: If Spotify asks for confirmation to clear the queue, confirm the action. This step is important to ensure you don’t accidentally remove your queue.
- Queue Cleared: Congratulations! Your queue is now completely empty. You can now add new songs to the queue or play individual tracks without the previous queue.
By following these steps, you can easily clear your Spotify queue on your Windows computer and enjoy a fresh listening experience.
Clearing Spotify Queue on Mac:
How to clear queue on Spotify on Mac? If you’re using a Mac and Spotify on your Mac, the following guide will help you clear the queue on your Spotify app.
- Open Spotify on Mac: Launch the Spotify application on your Mac computer.
- Play a Song from the Queue: Start playing any song that is currently in your queue by clicking on it.
- Access the Queue: To manage your queue, find the “Queue” button located at the bottom of the Spotify interface. This button is usually represented by three horizontal lines (≡). Click on it.
- View Queued Songs: A panel will pop up, displaying the songs that are currently in your queue.
- Clear the Queue: Within the queue panel, search for either a trash can icon or an option that says “Clear.” Click on this icon or option to begin the process of removing all songs from the queue.
- Confirmation: If Spotify prompts you to confirm the action of clearing the queue, confirm it. This step is crucial to ensure you don’t accidentally remove your queue.
- Queue Cleared: Congratulations! Your queue is now completely empty. You can now add new songs to the queue or play individual tracks without the previous queue.
By following these steps, you can easily clear your Spotify queue on your Mac computer and enjoy a fresh listening experience.
What to do if Spotify Clear Queue Button Missing?
It’s a pity to clear all of the songs from the queue if you only like a couple of them. In this situation, removing the songs that you dislike from the queue is the best thing to do, as it’s less time-consuming than creating a fresh queue playlist.
So, you can follow the below-mentioned steps to do that. Now, I’ll first tell you the method for removing some songs from Spotify on your smartphone, and then the next method will be on your desktop.
For Mobile:
- Select the songs you want to remove from your Spotify queue.
- Find the “REMOVE” button at the bottom-right of the screen.
- Click “REMOVE” to make those songs disappear from the queue.
For Desktop:
- On the Spotify desktop app, right-click next to each song you want to remove.
- Choose the “Remove from queue” option.
FAQs:
Conclusion
How to clear a queue on Spotify? Now you know very well how to do that. I’ve told you all the methods I use myself to clear the queue and remove certain songs from it. Also, I’ve told you different methods for different operating systems.
